Network
Network interfaces
This page applies to:
- HAProxy ALOHA - all versions
You can configure the HAProxy ALOHA network interfaces so that they are compatible with the switches, routers and servers on your network.
Virtual appliance
If you add a network interface to an HAProxy ALOHA virtual appliance, use a driver designed for VMs, such as VMXNET3. In particular, don’t use the E1000 driver because it isn’t optimized for use on a hypervisor.
Set a network interface’s speed Jump to heading
You can configure the maximum speed at which HAProxy ALOHA transmits data over your network. These days, most network equipment you connect to, such as switches, routers, and servers, supports autonegotiation of the network speed. So, in most cases, you will leave auto mode enabled.
However, if your network equipment doesn’t support autonegotiation and you want to be sure you are using the fastest compatible transmission speed, you can force the transmission speed.
Use the web UI to set the speed of a network interface:
-
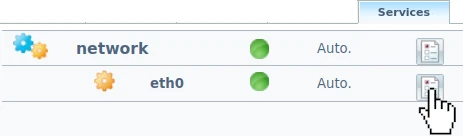
In the Services tab, click network instance setup next to a network interface.
-
Disable autonegotiation.
Autonegotiation is an Ethernet procedure by which two connected devices choose common transmission parameters, such as speed, duplex mode, and flow control.
service network eth0
  auto off
service network eth0 auto off -
Set the speed of the link. You can specify a speed of 10 Mbps, 100 Mbps, or 1000 Mbps (1Gbit).
service network eth0 auto off speed 1000service network eth0 auto off speed 1000 -
Click OK and Close to return to the Services tab.
-
Reload the network interface service.
In versions newer than 16.0, click the Apply new configuration button on the interface to apply the changes and automatically restart the network interface service.
-
To make your changes persistent after a reboot, click the Setup tab. Then click Save under Configuration.
This method applies to HAProxy ALOHA 16.5 and newer
Use the Network Management CLI to set the speed of a network interface:
-
If you haven’t already done so, install the Network Management CLI.
-
Go to the Tools tab and click Launch terminal.
-
Use the
netctl connection showcommand to show existing connection profiles. From the output, get theIDto use in subsequent commands.nixsudo netctl connection shownixsudo netctl connection showoutputtextID UUID TYPE DEVICEethernet-eth0 b6a82f6f-3fdd-467f-b2a1-9e343ba66288 ethernet eth0ethernet-eth1 8805fda9-b1a7-4d5c-bd83-615ceb9e9fdd ethernet eth1outputtextID UUID TYPE DEVICEethernet-eth0 b6a82f6f-3fdd-467f-b2a1-9e343ba66288 ethernet eth0ethernet-eth1 8805fda9-b1a7-4d5c-bd83-615ceb9e9fdd ethernet eth1 -
Using the connection profile’s
ID, callnetctl connection modifyto modify your existing network interface to set the network speed.- Set
ethernet.auto-negotiatetooff, so you can manually set thespeedproperty. - Set
ethernet.speedto10,100, or1000Mbps.
nixnetctl connection modify ethernet-eth0 \ethernet.auto-negotiate off \ethernet.speed 100nixnetctl connection modify ethernet-eth0 \ethernet.auto-negotiate off \ethernet.speed 100 - Set
-
Use
netctl connection upto restart the network service.nixsudo netctl connection up ethernet-eth0nixsudo netctl connection up ethernet-eth0outputtext# Stopping network[eth0] ...==> stop network[eth0] : Done.# Starting network[eth0] ...==> Link configuration changed for interface eth0==> start network[eth0] : Done.==> load ip config network[eth0] : Done.Connection successfully activatedoutputtext# Stopping network[eth0] ...==> stop network[eth0] : Done.# Starting network[eth0] ...==> Link configuration changed for interface eth0==> start network[eth0] : Done.==> load ip config network[eth0] : Done.Connection successfully activated -
Save the configuration to make your changes persistent after a reboot.
nixsudo config savenixsudo config save
Use the config command to set the speed of a network interface.
-
Become the
rootuser.nixrootnixroot -
Disable auto-negotiation on a network interface, which is an Ethernet procedure by which two connected devices choose common transmission parameters for speed and duplex mode. If you set
autotooff, you can manually set thespeedproperty.nixconfig set network.eth0 auto offnixconfig set network.eth0 auto off -
Set the
speedproperty to10,100, or1000Mbps.nixconfig set network.eth0 speed 1000nixconfig set network.eth0 speed 1000 -
Restart the
networkservice.nixservice network restartnixservice network restart -
Save the configuration to make your changes persistent after a reboot.
nixconfig savenixconfig save
Set a network interface’s duplex mode Jump to heading
You can configure the duplex mode of the network interfaces to control whether data is transmitted in one direction at a time between the load balancer and its peer, or in both directions simultaneously, which is more efficient. Most network equipment can negotiate the duplex mode automatically.
By default, the duplex mode is autonegotiated by the client and HAProxy ALOHA.
You can force the duplex mode:
- In half-duplex mode, the network interface is either sending or receiving data, but not at the same time.
- In full-duplex mode, the network interface will both send and receive data at the same time.
Use the web UI to set the duplex mode of a network interface:
-
In the Services tab, click network instance setup next to a network interface.
-
Disable autonegotiation.
Autonegotiation is an Ethernet procedure by which two connected devices choose common transmission parameters, such as speed, duplex mode, and flow control.
service network eth0
  auto off
service network eth0 auto off -
Do one of the following:
-
Configure the network interface in half-duplex mode.
service network eth0 auto off duplex halfservice network eth0 auto off duplex half -
Configure the network interface in full duplex mode.
service network eth0
  auto off
  duplex full
service network eth0 auto off duplex full
-
-
Click OK and Close to return to the Services tab.
-
Reload the network interface service.
In versions newer than 16.0, click the Apply new configuration button on the interface to apply the changes and automatically restart the network interface service.
-
To make your changes persistent after a reboot, click the Setup tab. Then click Save under Configuration.
This method applies to HAProxy ALOHA 16.5 and newer
Use the Network Management CLI to set the duplex mode of a network interface:
-
If you haven’t already done so, install the Network Management CLI.
-
Go to the Tools tab and click Launch terminal.
-
Use the
netctl connection showcommand to show existing connection profiles. From the output, get theIDto use in subsequent commands.nixsudo netctl connection shownixsudo netctl connection showoutputtextID UUID TYPE DEVICEethernet-eth0 b6a82f6f-3fdd-467f-b2a1-9e343ba66288 ethernet eth0ethernet-eth1 8805fda9-b1a7-4d5c-bd83-615ceb9e9fdd ethernet eth1outputtextID UUID TYPE DEVICEethernet-eth0 b6a82f6f-3fdd-467f-b2a1-9e343ba66288 ethernet eth0ethernet-eth1 8805fda9-b1a7-4d5c-bd83-615ceb9e9fdd ethernet eth1 -
Using the connection profile’s
ID, callnetctl connection modifyto modify your existing network interface to set the duplex mode.- Set
ethernet.auto-negotiatetooff, so you can manually set theduplexproperty. - Set
ethernet.duplextohalforfull.
nixnetctl connection modify ethernet-eth0 \ethernet.auto-negotiate off \ethernet.duplex halfnixnetctl connection modify ethernet-eth0 \ethernet.auto-negotiate off \ethernet.duplex half - Set
-
Use
netctl connection upto restart the network service.nixsudo netctl connection up ethernet-eth0nixsudo netctl connection up ethernet-eth0outputtext# Stopping network[eth0] ...==> stop network[eth0] : Done.# Starting network[eth0] ...==> Link configuration changed for interface eth0==> start network[eth0] : Done.==> load ip config network[eth0] : Done.Connection successfully activatedoutputtext# Stopping network[eth0] ...==> stop network[eth0] : Done.# Starting network[eth0] ...==> Link configuration changed for interface eth0==> start network[eth0] : Done.==> load ip config network[eth0] : Done.Connection successfully activated -
Save the configuration to make your changes persistent after a reboot.
nixsudo config savenixsudo config save
Use the config command to set the duplex mode of a network interface.
-
Become the
rootuser.nixrootnixroot -
Disable auto-negotiation on a network interface, which is an Ethernet procedure by which two connected devices choose common transmission parameters for speed and duplex mode. If you set
autotooff, you can manually set theduplexproperty.nixconfig set network.eth0 auto offnixconfig set network.eth0 auto off -
Do one of the following:
-
Configure the network interface in half-duplex mode.
nixconfig set network.eth0 duplex halfnixconfig set network.eth0 duplex half -
Configure the network interface in full duplex mode.
nixconfig set network.eth0 duplex fullnixconfig set network.eth0 duplex full
-
-
Restart the
networkservice.nixservice network restartnixservice network restart -
Save the configuration to make your changes persistent after a reboot.
nixconfig savenixconfig save
Set a network interface’s MTU Jump to heading
The Maximum Transmission Unit (MTU) is the largest data packet that the network interface can accept.
The default MTU value is 1500, which is a common value used for backwards compatibility with 10 Mbps and 100 Mbps networks. However, on faster networks, such as Gigabit Ethernet, increasing this value can deliver superior performance. For example, a value of 9000 is common to support jumbo frames.
Use the web UI to set the Maximum Transmission Unit of a network interface:
-
In the Services tab, click network instance setup next to a network interface.
-
Disable autonegotiation.
Autonegotiation is an Ethernet procedure by which two connected devices choose common transmission parameters, such as speed, duplex mode, and flow control.
service network eth0
  auto off
service network eth0 auto off -
Configure the MTU.
service network eth0 auto off mtu 9000service network eth0 auto off mtu 9000 -
Click OK and Close to return to the Services tab.
-
Reload the network interface service.
In versions newer than 16.0, click the Apply new configuration button on the interface to apply the changes and automatically restart the network interface service.
-
To make your changes persistent after a reboot, click the Setup tab. Then click Save under Configuration.
This method applies to HAProxy ALOHA 16.5 and newer
Use the Network Management CLI to set the Maximum Transmission Unit of a network interface:
-
If you haven’t already done so, install the Network Management CLI.
-
Go to the Tools tab and click Launch terminal.
-
Use the
netctl connection showcommand to show existing connection profiles. From the output, get theIDto use in subsequent commands.nixsudo netctl connection shownixsudo netctl connection showoutputtextID UUID TYPE DEVICEethernet-eth0 b6a82f6f-3fdd-467f-b2a1-9e343ba66288 ethernet eth0ethernet-eth1 8805fda9-b1a7-4d5c-bd83-615ceb9e9fdd ethernet eth1outputtextID UUID TYPE DEVICEethernet-eth0 b6a82f6f-3fdd-467f-b2a1-9e343ba66288 ethernet eth0ethernet-eth1 8805fda9-b1a7-4d5c-bd83-615ceb9e9fdd ethernet eth1 -
Using the connection profile’s
ID, callnetctl connection modifyto modify your existing network interface to set the MTU.- Set
ethernet.auto-negotiatetooff, so you can manually set themtuproperty. - Set
ethernet.mtuto the MTU value.
nixnetctl connection modify ethernet-eth0 \ethernet.auto-negotiate off \ethernet.mtu 9000nixnetctl connection modify ethernet-eth0 \ethernet.auto-negotiate off \ethernet.mtu 9000 - Set
-
Use
netctl connection upto restart the network service.nixsudo netctl connection up ethernet-eth0nixsudo netctl connection up ethernet-eth0outputtext# Stopping network[eth0] ...==> stop network[eth0] : Done.# Starting network[eth0] ...==> Link configuration changed for interface eth0==> start network[eth0] : Done.==> load ip config network[eth0] : Done.Connection successfully activatedoutputtext# Stopping network[eth0] ...==> stop network[eth0] : Done.# Starting network[eth0] ...==> Link configuration changed for interface eth0==> start network[eth0] : Done.==> load ip config network[eth0] : Done.Connection successfully activated -
Save the configuration to make your changes persistent after a reboot.
nixsudo config savenixsudo config save
Use the config command to set the MTU of a network interface.
-
Become the
rootuser.nixrootnixroot -
Disable auto-negotiation on a network interface, which is an Ethernet procedure by which two connected devices choose common transmission parameters for speed and duplex mode. If you set
autotooff, you can manually set themtuproperty.nixconfig set network.eth0 auto offnixconfig set network.eth0 auto off -
Set the
mtuproperty to the MTU value.nixconfig set network.eth0 mtu 9000nixconfig set network.eth0 mtu 9000 -
Restart the
networkservice.nixservice network restartnixservice network restart -
Save the configuration to make your changes persistent after a reboot.
nixconfig savenixconfig save