Observability
Configure Simple Network Management Protocol (SNMP)
This page applies to:
- HAProxy ALOHA - all versions
This section describes how to configure Simple Network Management Protocol (SNMP) on HAProxy ALOHA. It supports SNMPv2c and SNMPv3. With SNMP, you can:
- Enable the collection of metrics from the HAProxy ALOHA server.
- Enable SNMP traps, which allows your network monitoring software to get notifications about important events.
Enable SNMP metrics Jump to heading
There are two ways to enable SNMP metrics:
- During the initial setup of the appliance via the configuration wizard.
- On a running HAProxy ALOHA from the Services tab.
During the initial setup Jump to heading
When first setting up your HAProxy ALOHA appliance, you can configure SNMP through the initial configuration wizard. Running the wizard will erase all previous network settings you have already saved.
-
On the web user interface, click the Wizard tab. Then click Next to start.
-
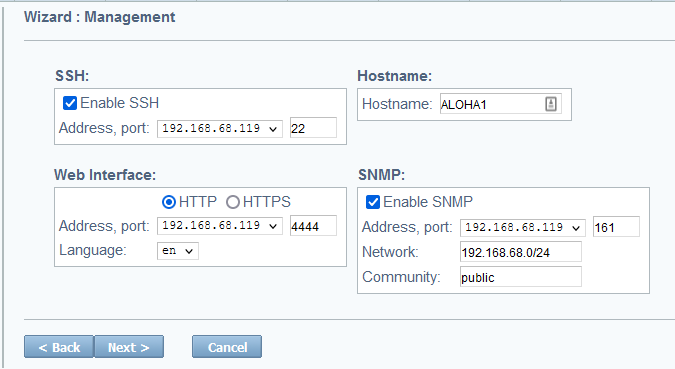
The wizard guides you through configuring several networking options. One of the final screens is labeled Management and lets you enable SNMP monitoring.
-
In the SNMP section, configure options to allow an SNMP management server to collect metrics from this HAProxy ALOHA appliance. This uses SNMPv2c.
-
Check the Enable SNMP box.
-
Set the IP address and port on which HAProxy ALOHA should accept SNMP requests. You can also set this to an asterisk to listen on all IP addresses assigned to the server.
-
For Network, enter a subnetwork to restrict the IP addresses from which SNMP requests are allowed to originate. Set this to a network prefix and CIDR, such as
192.168.1.0/24. -
For Community, enter a community string. This serves as a shared password that the SNMP management server must send with its request.
-
-
Click Next to go to the next step.
-
Review the summary of changes, then click Apply to complete the setup.
-
To make the configuration changes persist after a reboot, go to the Setup tab and click Save within the Configuration section.
From the Services tab Jump to heading
From the Services tab, you can configure SNMPv2c or SNMPv3.
-
In the Services tab, click snmpd setup on the snmpd line. The snmpd service’s setup file displays.
-
Set the following fields, depending on if you want to use SNMPv2c or SNMPv3. Refer to the examples below:
SNMPv2c exampletextservice snmpd# no autostartlisten 192.168.68.119port 161network 192.168.68.0/24community publicSNMPv2c exampletextservice snmpd# no autostartlisten 192.168.68.119port 161network 192.168.68.0/24community publicSNMPv3 exampletextservice snmpd# no autostartlisten 192.168.68.119port 161use_v3user monitorpassword mypasswordpassphrase mypassphraseSNMPv3 exampletextservice snmpd# no autostartlisten 192.168.68.119port 161use_v3user monitorpassword mypasswordpassphrase mypassphraseSetting Description no autostartDisables the service from automatically starting. listen <ip[@iface]>The IP address and optional network interface at which the SNMP service listens. Network monitoring software will collect data from here. Default: 0.0.0.0port <integer>The UDP port at which the SNMP service listens. Default: 161network <network>SNMPv2c only. Only clients in this network range are authorized to connect. Default: 0.0.0.0/0community <text>SNMPv2c only. The community string. This acts as a password that clients must send when connecting. Default: publicuse_v3SNMPv3 only. Forces the use of SNMPv3 and disables SNMPv2c. user <text>SNMPv3 only. The read-only username. Clients will use this username when connecting. Default: monitorpassword <text>SNMPv3 only. The password, using the SHA algorithm. Clients will use this password when connecting. Default: mypasswordpassphrase <text>SNMPv3 only. The passphrase, using the AES algorithm. Clients will use this passphrase when connecting. Default: mypassphrase -
Click OK and Close.
-
Restart the snmpd service.
-
Optional: On the LB Layer7 tab, add
iddirectives to yourfrontendandbackendsections. Theiddirective’s value is an integer that indicates that section’s unique identifier, which will appear in the SNMP output, making it easier to tell onefrontendorbackendfrom another. Otherwise, an ID will be set for you. The IDs for a frontend and backend do not need to relate in any way.haproxyfrontend wwwid 1backend webserversid 10backend dbserversid 20haproxyfrontend wwwid 1backend webserversid 10backend dbserversid 20 -
To make the configuration changes persist after a reboot, go to the Setup tab and click Save within the Configuration section.
Verify your setup Jump to heading
Follow these steps to verify your setup. On another Linux machine in the network, not on the HAProxy ALOHA server, test your connection to the HAProxy ALOHA SNMP service:
-
From the ALOHA MIBS download site, download the file
HAPROXYTECH-MIB.mib. For versions older than 16.0, useEXCELIANCE-MIB.txt.What is a MIB file?
A MIB is a Management Information Base. It’s a text file that defines the properties of the device you want to query, with the properties organized into a hierarchical tree. Organizations place their device’s property definitions into a MIB file so that users and software can refer to it when forming queries. It allows you to use a human-readable name instead of a numeric identifier (the object ID) of the property. For example, you can query for
HAPROXYTECH-MIB:alProductNameinstead of1.3.6.1.4.1.58750.4.2.1.1.1, although both would return the same result. -
Copy
HAPROXYTECH-MIB.mibto/usr/share/alohaon the Linux machine. For example:nixsudo mkdir -p /usr/share/aloha/sudo cp ~/HAPROXYTECH-MIB.mib /usr/share/aloha/nixsudo mkdir -p /usr/share/aloha/sudo cp ~/HAPROXYTECH-MIB.mib /usr/share/aloha/ -
Install the SNMP management software package. The SNMP management software provides tools for testing that your SNMP setup works by making SNMP queries.
nixsudo apt updatesudo apt install snmpnixsudo apt updatesudo apt install snmpnixsudo yum install net-snmp-utils net-snmpnixsudo yum install net-snmp-utils net-snmp -
On Debian and Ubuntu, perform these additional steps:
-
Configure the management software to load Management Information Bases (MIBs) by editing the file
/etc/snmp/snmp.confand commenting out themibsline so that it looks like this:snmp.conftext# mibs :snmp.conftext# mibs : -
Append the path to the MIB directory,
/usr/share/aloha, to the end of themibdirsline, and uncomment it if it is commented out:snmp.conftextmibdirs /usr/share/snmp/mibs:/usr/share/snmp/mibs/iana:/usr/share/snmp/mibs/ietf:/usr/share/alohasnmp.conftextmibdirs /usr/share/snmp/mibs:/usr/share/snmp/mibs/iana:/usr/share/snmp/mibs/ietf:/usr/share/aloha -
Add the
non-freerepository to the existing line in/etc/apt/sources.list, which will allow you to install thesnmp-mibs-downloaderpackage:sources.listtextdeb https://deb.debian.org/debian bullseye main non-freesources.listtextdeb https://deb.debian.org/debian bullseye main non-free -
Add the MIB files by installing the
snmp-mibs-downloaderpackage:nixsudo apt updatesudo apt install snmp-mibs-downloadernixsudo apt updatesudo apt install snmp-mibs-downloader
-
-
Use
snmpwalkto get information about HAProxy ALOHA.-
If you downloaded
HAPROXYTECH-MIB.mib, query forHAPROXYTECH-MIB:aloha. If you downloadedEXCELIANCE-MIB.txt, query forEXCELIANCE-MIB:alohainstead.On Debian/Ubuntu:
nixsnmpwalk -c public -v2c 192.168.68.119 HAPROXYTECH-MIB:alohanixsnmpwalk -c public -v2c 192.168.68.119 HAPROXYTECH-MIB:alohaOn RHEL:
nixsnmpwalk -c public -v2c -M /usr/share/snmp/mibs:/usr/share/aloha 192.168.68.119 HAPROXYTECH-MIB:alohanixsnmpwalk -c public -v2c -M /usr/share/snmp/mibs:/usr/share/aloha 192.168.68.119 HAPROXYTECH-MIB:alohaoutputtextHAPROXYTECH-MIB::alProductName = STRING: "aloha"HAPROXYTECH-MIB::alProductModel = STRING: "albva"HAPROXYTECH-MIB::alProductVersion = STRING: "16.0"HAPROXYTECH-MIB::alProductSubVersion = STRING: "16.0.0rc2"HAPROXYTECH-MIB::alProductBuildVersion = STRING: "1605"HAPROXYTECH-MIB::alProductBuildDate = STRING: "2024-03-13 10:24:57"...outputtextHAPROXYTECH-MIB::alProductName = STRING: "aloha"HAPROXYTECH-MIB::alProductModel = STRING: "albva"HAPROXYTECH-MIB::alProductVersion = STRING: "16.0"HAPROXYTECH-MIB::alProductSubVersion = STRING: "16.0.0rc2"HAPROXYTECH-MIB::alProductBuildVersion = STRING: "1605"HAPROXYTECH-MIB::alProductBuildDate = STRING: "2024-03-13 10:24:57"...
-
If you downloaded
HAPROXYTECH-MIB.mib, query forHAPROXYTECH-MIB:aloha. If you downloadedEXCELIANCE-MIB.txt, query forEXCELIANCE-MIB:alohainstead.On Debian/Ubuntu:
nixsnmpwalk -v3 -u monitor -a SHA -A mypassword -x AES -X mypassphrase -l authPriv 192.168.68.119 HAPROXYTECH-MIB:alohanixsnmpwalk -v3 -u monitor -a SHA -A mypassword -x AES -X mypassphrase -l authPriv 192.168.68.119 HAPROXYTECH-MIB:alohaOn RHEL:
nixsnmpwalk -v3 -u monitor -a SHA -A mypassword -x AES -X mypassphrase -l authPriv -M /usr/share/snmp/mibs:/usr/share/aloha -m HAPROXYTECH-MIB 192.168.56.50 HAPROXYTECH-MIB:alohanixsnmpwalk -v3 -u monitor -a SHA -A mypassword -x AES -X mypassphrase -l authPriv -M /usr/share/snmp/mibs:/usr/share/aloha -m HAPROXYTECH-MIB 192.168.56.50 HAPROXYTECH-MIB:alohaoutputtextHAPROXYTECH-MIB::alProductName = STRING: "aloha"HAPROXYTECH-MIB::alProductModel = STRING: "albva"HAPROXYTECH-MIB::alProductVersion = STRING: "16.0"HAPROXYTECH-MIB::alProductSubVersion = STRING: "16.0.0rc2"HAPROXYTECH-MIB::alProductBuildVersion = STRING: "1605"HAPROXYTECH-MIB::alProductBuildDate = STRING: "2024-03-13 10:24:57"...outputtextHAPROXYTECH-MIB::alProductName = STRING: "aloha"HAPROXYTECH-MIB::alProductModel = STRING: "albva"HAPROXYTECH-MIB::alProductVersion = STRING: "16.0"HAPROXYTECH-MIB::alProductSubVersion = STRING: "16.0.0rc2"HAPROXYTECH-MIB::alProductBuildVersion = STRING: "1605"HAPROXYTECH-MIB::alProductBuildDate = STRING: "2024-03-13 10:24:57"...
-
Enable SNMP traps Jump to heading
An SNMP trap is a notification that HAProxy ALOHA can send to a remote server when important events occur, such as backend servers stopping and starting. A remote server must be configured to receive these notifications.
This feature supports SNMPv2c.
-
In the Services tab, click notify setup on the notify line. The notify service’s setup file displays.
-
Set the following fields:
textservice notify# no autostartsnmp_server 192.168.68.120snmp_community publictextservice notify# no autostartsnmp_server 192.168.68.120snmp_community publicwhere:
no autostartis commented out (has a hash sign in front) to disable it and allow the service to start automatically.snmp_serveris the IP address of the remote server that will receive the SNMP notifications.snmp_communityis the SNMPv2c community string set on the remote server.
-
Click OK and Close to return to the Services tab.
-
On the line notify, click restart.
-
To make the configuration changes persist after a reboot, go to the Setup tab and click Save within the Configuration section.
Verify your setup Jump to heading
To demonstrate SNMP traps, we will configure a remote server to receive them. On the remote Linux server:
-
Install
snmptrapd, which is software for receiving SNMP traps. By default, it will listen on UDP port 162.nixsudo apt updatesudo apt install snmptrapdnixsudo apt updatesudo apt install snmptrapdnixsudo yum install net-snmp net-snmp-utilsnixsudo yum install net-snmp net-snmp-utils -
Create a custom script to handle notifications when they arrive. For example, the script below writes the notification messages to a file:
logtrap.sh#!/bin/bash STDIN=$(cat) FILE=/tmp/trap-messages.txt TIMESTAMP=$(date +"%Y-%m-%d %T") echo "Time: $TIMESTAMP" >> $FILE echo $STDIN >> $FILElogtrap.sh#!/bin/bash STDIN=$(cat) FILE=/tmp/trap-messages.txt TIMESTAMP=$(date +"%Y-%m-%d %T") echo "Time: $TIMESTAMP" >> $FILE echo $STDIN >> $FILESave this as
/usr/local/bin/logtrap.shand make it executable:nixsudo chmod +x /usr/local/bin/logtrap.shnixsudo chmod +x /usr/local/bin/logtrap.sh -
Edit
/etc/snmp/snmptrapd.confto use the example script. For example:snmptrapd.conftextauthCommunity log,execute,net publictraphandle default /usr/local/bin/logtrap.shsnmptrapd.conftextauthCommunity log,execute,net publictraphandle default /usr/local/bin/logtrap.shwhere:
authCommunitysets the community string topublic.traphandleinvokes the example script when a notification arrives.
-
Enable and start the service:
nixsudo systemctl enable snmptrapdsudo systemctl start snmptrapdnixsudo systemctl enable snmptrapdsudo systemctl start snmptrapdCheck the
/tmp/trap-messages.txtlog file for new messages.trap-messages.txttextTime: 2024-04-06 01:56:44<UNKNOWN> UDP: [192.168.68.119]:42107->[192.168.68.120]:162 iso.3.6.1.2.1.1.3.0 0:15:16:42.50 iso.3.6.1.6.3.1.1.4.1.0 iso.3.6.1.4.1.23263.3.1002 iso.3.6.1.4.1.23263.2.1 213 iso.3.6.1.4.1.23263.2.2 "213: Backend webfarm is UP" iso.3.6.1.4.1.23263.2.3 "webfarm"Time: 2024-04-06 01:56:44<UNKNOWN> UDP: [192.168.68.119]:18902->[192.168.68.120]:162 iso.3.6.1.2.1.1.3.0 0:15:16:42.52 iso.3.6.1.6.3.1.1.4.1.0 iso.3.6.1.4.1.23263.3.1002 iso.3.6.1.4.1.23263.2.1 211 iso.3.6.1.4.1.23263.2.2 "211: Server webfarm/websrv1 is UP" iso.3.6.1.4.1.23263.2.3 "websrv1"trap-messages.txttextTime: 2024-04-06 01:56:44<UNKNOWN> UDP: [192.168.68.119]:42107->[192.168.68.120]:162 iso.3.6.1.2.1.1.3.0 0:15:16:42.50 iso.3.6.1.6.3.1.1.4.1.0 iso.3.6.1.4.1.23263.3.1002 iso.3.6.1.4.1.23263.2.1 213 iso.3.6.1.4.1.23263.2.2 "213: Backend webfarm is UP" iso.3.6.1.4.1.23263.2.3 "webfarm"Time: 2024-04-06 01:56:44<UNKNOWN> UDP: [192.168.68.119]:18902->[192.168.68.120]:162 iso.3.6.1.2.1.1.3.0 0:15:16:42.52 iso.3.6.1.6.3.1.1.4.1.0 iso.3.6.1.4.1.23263.3.1002 iso.3.6.1.4.1.23263.2.1 211 iso.3.6.1.4.1.23263.2.2 "211: Server webfarm/websrv1 is UP" iso.3.6.1.4.1.23263.2.3 "websrv1"
See also Jump to heading
- For general information about the configuration wizard, see Initial configuration wizard.