Network
Assign IP addresses
This page applies to:
- HAProxy ALOHA - all versions
On this page, you’ll learn how to manage IP addresses assigned to HAProxy ALOHA.
Assign a static IP address Jump to heading
You must assign a static internal IP address to your appliance. Use this IP address for managing the appliance. It can be different from the IP address used to receive incoming traffic. If you manage a pair of appliances, assign each one a different IP address so you can connect to each of them.
To assign a static IP address through the web UI:
-
Connect to the web UI as user
adminwith the passwordadminathttp://<IP Address>:4444/. -
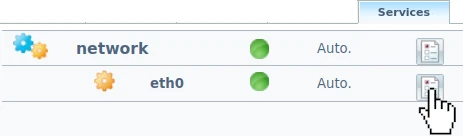
In the Services tab, click network instance setup next to a network interface.
-
Do one of the following:
-
Enter an IP address and a network mask, either class mask or CIDR format.
Example:
Network Interface Setupservice network eth0
  # Class mask format:
  ip address 172.16.24.237/255.255.255.0
  # CIDR format:
  # ip address 172.16.24.237/24
Network Interface Setupservice network eth0 # Class mask format: ip address 172.16.24.237/255.255.255.0 # CIDR format: # ip address 172.16.24.237/24 -
Enter an IP address alias and a network mask, either class mask or CIDR format.
Example:
Network Interface Setupservice network eth0
  # Class mask format:
  ip address 172.16.24.237/255.255.255.0
  ip address 172.16.24.238/255.255.255.255
  # CIDR format:
  # ip address 172.16.24.237/24
  # ip address 172.16.24.238/32
Network Interface Setupservice network eth0 # Class mask format: ip address 172.16.24.237/255.255.255.0 ip address 172.16.24.238/255.255.255.255 # CIDR format: # ip address 172.16.24.237/24 # ip address 172.16.24.238/32
-
-
Click OK and Close to return to the Services tab.
-
Reload the network interface.
In versions newer than 16.0, click the Apply new configuration button on the interface to apply the changes and automatically restart the network interface service.
-
To make your changes persistent after a reboot, click the Setup tab. Then click Save under Configuration.
This method applies to HAProxy ALOHA 16.5 and newer
To add a static IP address via the Network Management CLI:
-
If you haven’t already done so, install the Network Management CLI.
-
Go to the Tools tab and click Launch terminal.
-
Use the
netctl connection showcommand to show existing connection profiles. From the output, get theIDof the connection profile to use in subsequent commands.nixsudo netctl connection shownixsudo netctl connection showoutputtextID UUID TYPE DEVICEethernet-eth0 b6a82f6f-3fdd-467f-b2a1-9e343ba66288 ethernet eth0ethernet-eth1 8805fda9-b1a7-4d5c-bd83-615ceb9e9fdd ethernet eth1outputtextID UUID TYPE DEVICEethernet-eth0 b6a82f6f-3fdd-467f-b2a1-9e343ba66288 ethernet eth0ethernet-eth1 8805fda9-b1a7-4d5c-bd83-615ceb9e9fdd ethernet eth1 -
Using the connection profile’s
ID, callnetctl connection modifyto modify your existing network interface to add a new, static IP address.- Set
ipv4.methodtomanual, which lets you set IPv4 settings yourself instead of using DHCP. - Set
ipv4.addressesto your static IP address. - Set
ipv4.gatewayto your default gateway’s IP address.
nixsudo netctl connection modify ethernet-eth0 \ipv4.method manual \ipv4.addresses 172.16.24.237/24 \ipv4.gateway 172.16.24.1nixsudo netctl connection modify ethernet-eth0 \ipv4.method manual \ipv4.addresses 172.16.24.237/24 \ipv4.gateway 172.16.24.1To specify more than one IP address, separate them with a comma.
nixsudo netctl connection modify ethernet-eth0 \ipv4.method manual \ipv4.addresses 172.16.24.237/24,172.16.24.238/24 \ipv4.gateway 172.16.24.1nixsudo netctl connection modify ethernet-eth0 \ipv4.method manual \ipv4.addresses 172.16.24.237/24,172.16.24.238/24 \ipv4.gateway 172.16.24.1 - Set
-
Use
netctl connection upto restart the network service.nixsudo netctl connection up ethernet-eth0nixsudo netctl connection up ethernet-eth0outputtext# Stopping network[eth0] ...==> stop network[eth0] : Done.# Starting network[eth0] ...==> start network[eth0] : Done.==> load ip config network[eth0] : Done.Connection successfully activatedoutputtext# Stopping network[eth0] ...==> stop network[eth0] : Done.# Starting network[eth0] ...==> start network[eth0] : Done.==> load ip config network[eth0] : Done.Connection successfully activated -
Save the configuration to make your changes persistent after a reboot.
nixsudo config savenixsudo config save
To assign a static IP address by using the config command:
-
Connect to the appliance as user
adminwith the passwordadminthrough:- SSH at
http://<IP Address>:4444/, or - the serial port.
In version 13.5 and newer, you can also click Launch a terminal in the web UI’s Tools tab.
- SSH at
-
Become the
rootuser.nixrootnixroot -
Set up the IP address for the network interface.
nixconfig set network.<INTERFACE_NAME> ip-address <IP/NETMASK>nixconfig set network.<INTERFACE_NAME> ip-address <IP/NETMASK>Example:
nixconfig set network.eth0 ip-address 172.16.24.237/24nixconfig set network.eth0 ip-address 172.16.24.237/24 -
Restart the
networkservice:nixservice network restartnixservice network restart -
Connect HAProxy ALOHA to your network via the network interface you configured.
-
Ping HAProxy ALOHA.
-
If the ping succeeds, save the configuration to make your changes persistent after a reboot.
nixconfig savenixconfig save
Disable IPv6 on all network interfaces Jump to heading
To disable the IPv6 protocol on all network interfaces:
-
In the Services tab, click network setup next to the
networkservice to display the current configuration of your network interfaces.
-
Add these lines to the first
service networksection:textsysctl ipv6.conf.all.disable_ipv6=1sysctl ipv6.conf.default.disable_ipv6=1textsysctl ipv6.conf.all.disable_ipv6=1sysctl ipv6.conf.default.disable_ipv6=1 -
Click OK, then Close.
-
Click Apply new configuration on service network.
-
To make your changes persistent after a reboot, click the Setup tab. Then click Save under Configuration.
-
To verify, go to the Tools tab and click Launch terminal. The
ip addresscommand should returninetentries, but noinet6entries.nixip addressnixip addressoutputtext1: lo: <LOOPBACK,UP,LOWER_UP> mtu 65536 qdisc noqueue state UNKNOWN group default qlen 1000link/loopback 00:00:00:00:00:00 brd 00:00:00:00:00:00inet 127.0.0.1/9 scope host lovalid_lft forever preferred_lft forever2: eth0: <BROADCAST,MULTICAST,UP,LOWER_UP> mtu 1500 qdisc pfifo_fast state UP group default qlen 1000link/ether 00:0c:29:a5:ad:4f brd ff:ff:ff:ff:ff:ffinet 192.168.56.45/24 scope global eth0valid_lft forever preferred_lft foreveroutputtext1: lo: <LOOPBACK,UP,LOWER_UP> mtu 65536 qdisc noqueue state UNKNOWN group default qlen 1000link/loopback 00:00:00:00:00:00 brd 00:00:00:00:00:00inet 127.0.0.1/9 scope host lovalid_lft forever preferred_lft forever2: eth0: <BROADCAST,MULTICAST,UP,LOWER_UP> mtu 1500 qdisc pfifo_fast state UP group default qlen 1000link/ether 00:0c:29:a5:ad:4f brd ff:ff:ff:ff:ff:ffinet 192.168.56.45/24 scope global eth0valid_lft forever preferred_lft forever
Troubleshooting Jump to heading
This section describes common troubleshooting steps.
Duplicate IPs
To troubleshoot duplicate IPs, you can use the ARP who-has diagnostic tool.
This tool checks if the MAC address associated with the IP address is the one expected or not:
-
If yes, the problem may be on an upper layer
-
If not, the MAC address of the server has the duplicated IP
Ping
You can use the ping diagnostic tool to try to reach an IP address on the network.
See also Jump to heading
- You can also use HAProxy Data Plane API to configure a load balancer’s IP address. For details, see Manage IP addresses.