High availability
Active/Standby clustering
The Virtual Router Redundancy Protocol (VRRP) creates virtual routers that bind to a floating, virtual IP address that can be shared between an active and standby HAProxy ALOHA instance.
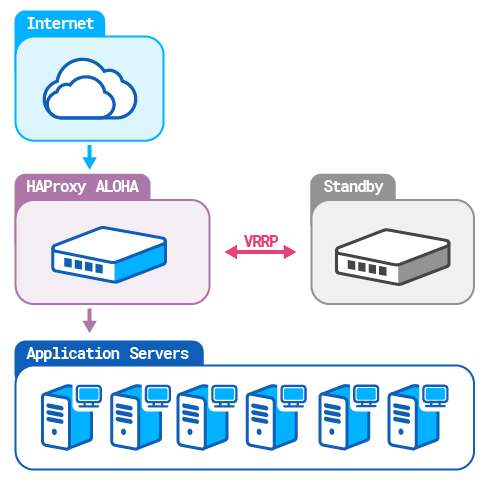
If the active instance should go offline, then the standby instance inherits the IP address and resumes serving traffic.
Configure the VRRP daemon on both instances Jump to heading
You must configure the VRRP daemon on both the active and the standby HAProxy ALOHA instances.
-
In the Services tab, make sure the
syslogdservice is up and running. -
In the Services tab, click vrrp setup.

Enter the following directives:
Directive Value groupEnable VRRP on group of network interfaces. Specify a single name or a space-separated list of interface names. track_svcCheck that the haproxyservice is running. Optionally, if you are using LVS, also add a check for theipvsdservice.track_mgtCheck that the sshdandwuiservices are running.no autostartRemove or comment out the line. Example:
textservice vrrpgroup eth0# Optionally, track ipvsd if using LVS.track_svc haproxy ipvsdtrack_mgt sshd wui# no autostarttextservice vrrpgroup eth0# Optionally, track ipvsd if using LVS.track_svc haproxy ipvsdtrack_mgt sshd wui# no autostart -
Restart the
vrrpservice.
Failover triggers Jump to heading
The following events can trigger a failover:
- The active instance lowers its weight below one of the backup instances due to a failed health check.
- A backup instance is reconfigured with a weight larger than the current active instance.
- The active instance stops emitting its heartbeat packet to the cluster.
Configure the active VRRP instance Jump to heading
-
Decide on a Virtual Router Identifier (VRID) for the cluster. The VRID can be any number between 1 and 255. It is a unique identifier that is the same on the active and standby instances. It allows the instances to share a virtual router and virtual IP address.
Do not use a VRID already in use. To list VRIDs already in use, do one of the following:
-
From the Tools tab, select capture from the drop-down, then enter the interface name where you will configure VRRP, and the
vrrpkeyword. Then run the diagnostic.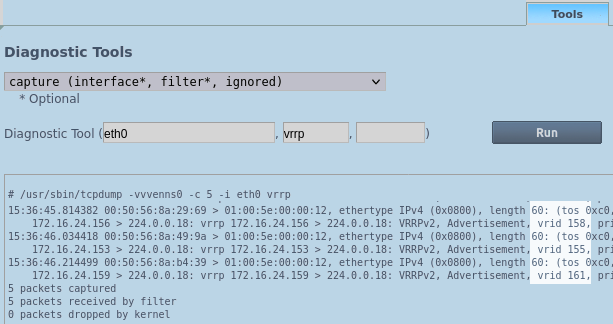
-
Run the following command from a terminal:
nixsudo tcpdump -vvvenns0 -c 5 -i eth0 vrrp | grep -o "vrid [0-9]*"nixsudo tcpdump -vvvenns0 -c 5 -i eth0 vrrp | grep -o "vrid [0-9]*"outputtext[...]5 packets captured6 packets received by filter0 packets dropped by kernelvrid 161vrid 155outputtext[...]5 packets captured6 packets received by filter0 packets dropped by kernelvrid 161vrid 155
-
-
In the Services tab, click network instance setup next to a network interface.

-
Enter the following parameters to create a new VRRP instance:
Directive Value vrrp inst default idEnter the VRID determined previously. vrrp inst default garpGratuitous ARP polling interval in seconds. 30. vrrp inst default prioVRRP instance default priority. 101 or higher for master.vrrp inst default addressThe Virtual IP. vrrp inst default passwordVRRP instance authentication password. aloha(recommended).vrrp inst default no-addressRecommended. Deconfigures the primary virtual IPv4 address for the virtual router, to bypass the protocol limitation on the maximum of authorized VIPs. Example:
textservice network eth0ip address 172.16.24.238/24ip route default 172.16.24.1vrrp inst default id 130vrrp inst default garp 30vrrp inst default prio 101vrrp inst default address 172.16.24.235vrrp inst default password alohavrrp inst default no-addresstextservice network eth0ip address 172.16.24.238/24ip route default 172.16.24.1vrrp inst default id 130vrrp inst default garp 30vrrp inst default prio 101vrrp inst default address 172.16.24.235vrrp inst default password alohavrrp inst default no-address -
Restart the
networkservice.
Configure the standby VRRP instance Jump to heading
-
In the Services tab, click network instance setup next to a network interface.
-
Add the following parameters to create a new VRRP instance:
Directive Value vrrp inst default idSame VRID as on the active HAProxy ALOHA instance. vrrp inst default garpGratuitous ARP polling interval in seconds. 30. vrrp inst default prioVRRP instance default priority. 100 for backup.vrrp inst default addressThe Virtual IP. vrrp inst default passwordVRRP instance authentication password. aloha(recommended).vrrp inst default no-addressRecommended. Deconfigures the primary virtual IPv4 address for the virtual router, to bypass the protocol limitation on the maximum of authorized VIPs. Example:
textservice network eth0ip address 172.16.24.237/24ip route default 172.16.24.1vrrp inst default id 130vrrp inst default garp 30vrrp inst default prio 100vrrp inst default address 172.16.24.235vrrp inst default password alohavrrp inst default no-addresstextservice network eth0ip address 172.16.24.237/24ip route default 172.16.24.1vrrp inst default id 130vrrp inst default garp 30vrrp inst default prio 100vrrp inst default address 172.16.24.235vrrp inst default password alohavrrp inst default no-address -
Restart the
networkservice.
Save your configuration on both instances Jump to heading
-
Select the Setup tab and click Save to save your configuration.
The
Configuration was successfully savedmessage displays.
You can also launch the following command from a terminal:
nixsudo config savenixsudo config save
Check that VRRP works Jump to heading
Warning
Perform the steps below in a test environment only.
In the steps below, we shut down the active instance and then verify that the VIP was transferred to the standby instance by comparing the MAC addresses returned for the VIP.
From a Linux machine on the same network, check which MAC address is associated with the VIP by executing arping.
-
Check the MAC address on your HAProxy ALOHA instances.
nixarp -anixarp -a -
Check which MAC addresses are associated with the VIP and the HAProxy ALOHA instances’ IP addresses.
nixsudo arping -c 5 -I ens192 172.16.24.235 | cut -d " " -f 4nixsudo arping -c 5 -I ens192 172.16.24.235 | cut -d " " -f 4outputtext00:50:56:8a:fc:52outputtext00:50:56:8a:fc:52nixsudo arping -c 5 -I ens192 172.16.24.237 | cut -d " " -f 4nixsudo arping -c 5 -I ens192 172.16.24.237 | cut -d " " -f 4outputtext00:50:56:8a:1a:78outputtext00:50:56:8a:1a:78nixsudo arping -c 5 -I ens192 172.16.24.238 | cut -d " " -f 4nixsudo arping -c 5 -I ens192 172.16.24.238 | cut -d " " -f 4outputtext00:50:56:8a:fc:52outputtext00:50:56:8a:fc:52The MAC address associated with the VIP is the active HAProxy ALOHA instance’s address.
-
Shut down your test HAProxy ALOHA instance, then check the MAC addresses.
nixsudo arping -c 5 -I ens192 172.16.24.235 | cut -d " " -f 4nixsudo arping -c 5 -I ens192 172.16.24.235 | cut -d " " -f 4outputtext00:50:56:8a:1a:78outputtext00:50:56:8a:1a:78nixsudo arping -c 5 -I ens192 172.16.24.237 | cut -d " " -f 4nixsudo arping -c 5 -I ens192 172.16.24.237 | cut -d " " -f 4outputtext00:50:56:8a:1a:78outputtext00:50:56:8a:1a:78nixsudo arping -c 5 -I ens192 172.16.24.238nixsudo arping -c 5 -I ens192 172.16.24.238outputtextTimeoutoutputtextTimeoutThe MAC address associated with the VIP is now the address of the previously standby HAProxy ALOHA instance.
Fail over to the standby instance Jump to heading
To manually fail over to the standby instance for doing routing maintenance on the active instance, reconfigure the backup instance a weight larger than the current active instance.
Troubleshooting Jump to heading
Detect duplicate IPs Jump to heading
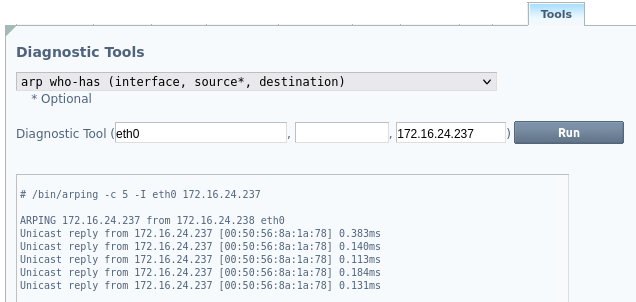
To troubleshoot duplicate IPs, you can use the ARP who-has diagnostic tool.
-
From the Tools tab, select arp who-has from the drop-down.
You can also run the following command from a terminal:
nixsudo arping -c 5 -I eth0 172.16.24.237nixsudo arping -c 5 -I eth0 172.16.24.237
If the MAC address associated with the IP address is:
- The address you expected, the problem may come from an upper layer.
- Not the address you expected, a duplicate IP is associated with the MAC address of the instance.
Capture VRRP packets Jump to heading
-
From the Tools tab, select capture from the drop-down.
-
Enter the interface name where you will configure VRRP, and the
vrrpkeyword, then run the diagnostic.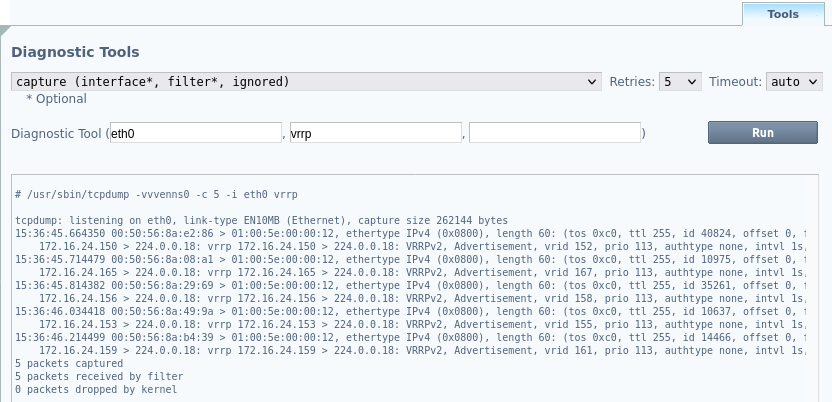
You can also run the following command from a terminal:
nixsudo tcpdump -vvvenns0 -c 5 -i eth0 vrrpnixsudo tcpdump -vvvenns0 -c 5 -i eth0 vrrp -
Check:
- The source MAC address
- The source IP address
- The VRID
- The VRRP priority
See also Jump to heading
Do you have any suggestions on how we can improve the content of this page?